Revamp Your Space With Stunning Chalk Paint Hutch: Transform Your Décor Now!

Chalk Paint Hutch: Transforming Furniture with Style
Greetings, Fashion Enthusiast! Are you looking to add a touch of elegance to your home decor? Look no further than the chalk paint hutch. This versatile piece of furniture can effortlessly elevate the aesthetic of any space. In this article, we will explore everything you need to know about chalk paint hutch, from its origin to its application techniques.
Introduction
The chalk paint hutch is a furniture piece that has gained popularity in recent years. It is characterized by its vintage charm and matte finish, which adds a unique touch to any room. This paint, made with a mixture of chalk, pigment, and water, offers a smooth and velvety texture that is unlike any other. Whether you want to revamp an old hutch or give a new one a distressed look, chalk paint is the perfect choice.
3 Picture Gallery: Revamp Your Space With Stunning Chalk Paint Hutch: Transform Your Décor Now!
Before we dive into the details, let’s take a look at the table below for a comprehensive overview of chalk paint hutch:
Topic
Description
Image Source: squarespace-cdn.com
What is Chalk Paint Hutch?
An introduction to chalk paint hutch and its unique characteristics.
Who Should Use Chalk Paint Hutch?
Discover who can benefit from using chalk paint hutch.
When Should You Choose Chalk Paint Hutch?
Learn about the ideal scenarios for using chalk paint hutch.
Where Can You Use Chalk Paint Hutch?
Explore the various spaces where chalk paint hutch can make a statement.
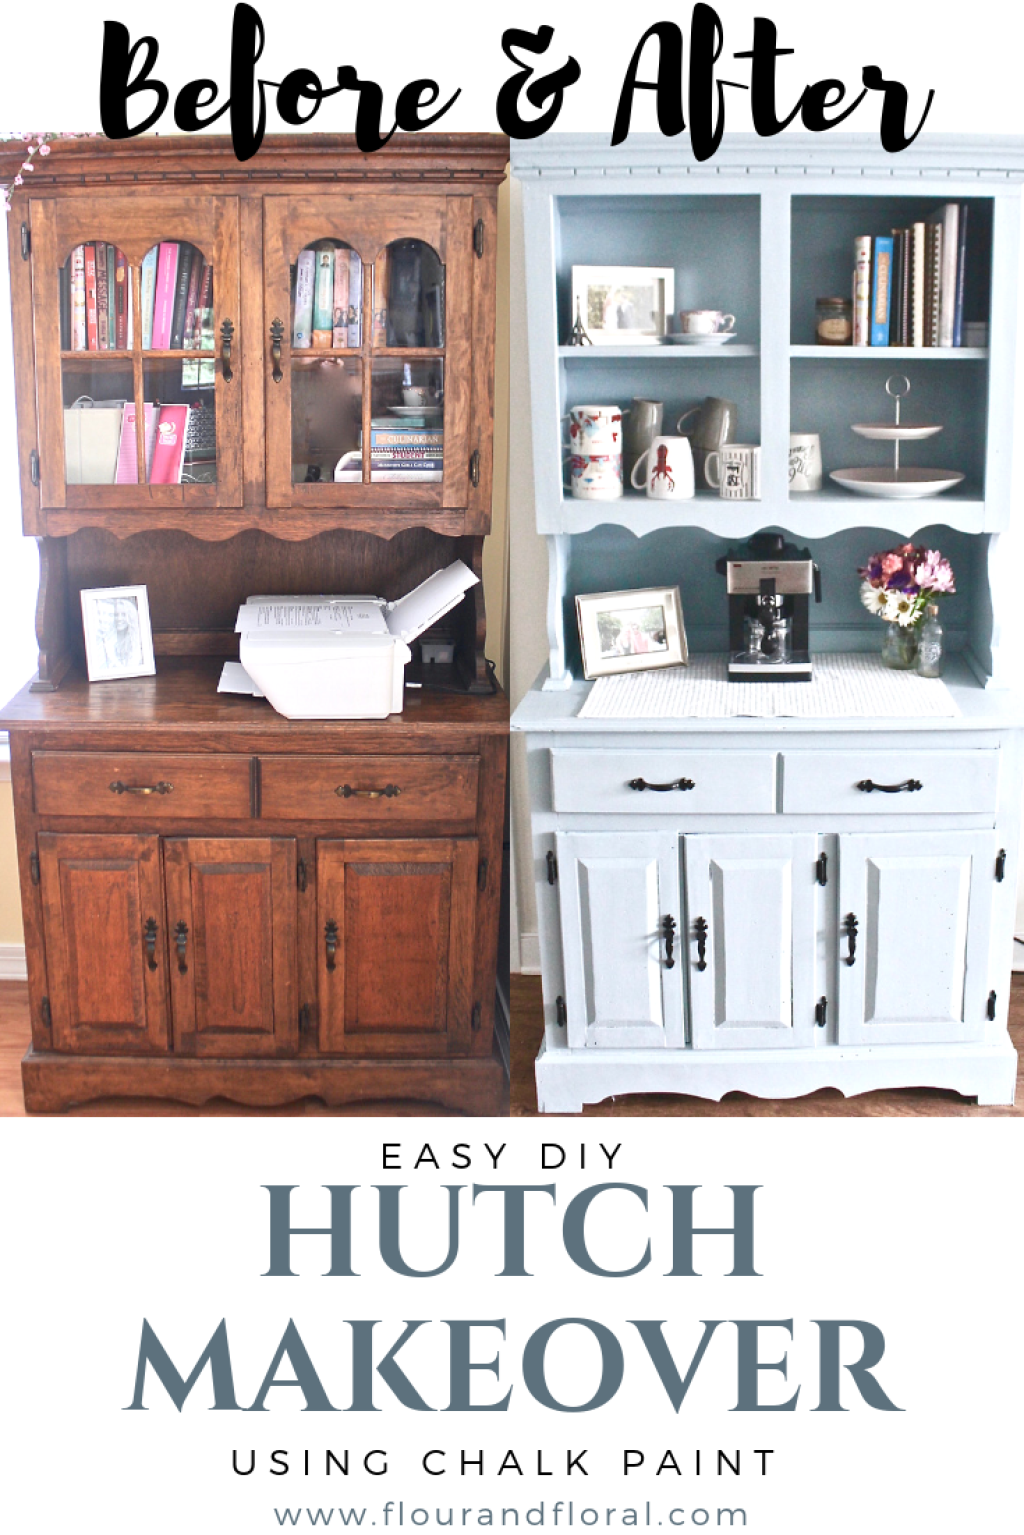
Image Source: flourandfloral.com
Why Choose Chalk Paint Hutch?
Uncover the reasons why chalk paint hutch is a popular choice among interior designers and DIY enthusiasts.
How to Apply Chalk Paint Hutch?
A step-by-step guide on how to achieve the perfect finish using chalk paint hutch.
Advantages and Disadvantages of Chalk Paint Hutch
Evaluate the pros and cons of using chalk paint hutch in your home.
Frequently Asked Questions
Get answers to common queries about chalk paint hutch.
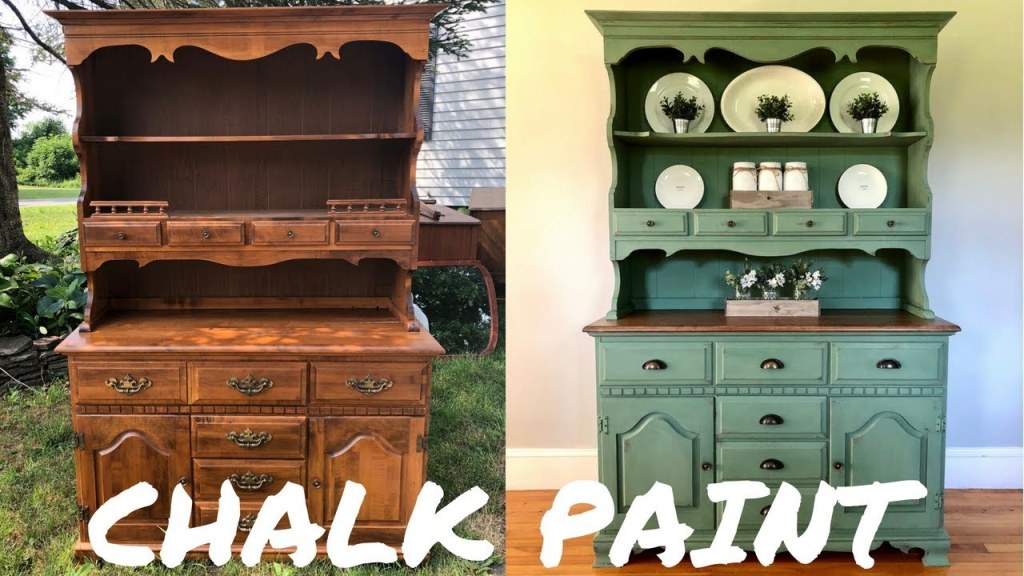
Image Source: ytimg.com
Conclusion
Inspire action and encourage readers to embark on their own chalk paint hutch projects.
Final Remarks
Provide additional information and disclaimers about chalk paint hutch.
What is Chalk Paint Hutch? 🎨
Chalk paint hutch refers to the application of chalk paint on a hutch, which is a freestanding piece of furniture with cabinets or shelves. The paint itself is made from a mixture of chalk, pigment, and water, giving it a unique matte finish. Unlike traditional paint, chalk paint does not require extensive preparation, such as sanding or priming, making it a popular choice for furniture makeovers.
Chalk paint hutch offers a distinct vintage charm that can transform any piece of furniture into a statement piece. The matte finish gives a velvety texture to the surface, adding depth and character to the overall look. It can be used to create various effects, such as a distressed or aged appearance, or a smooth and sleek finish.
Advantages of Chalk Paint Hutch
1. Easy to Use: Chalk paint hutch is beginner-friendly and does not require extensive preparation or special skills. It can be applied directly to most surfaces, including wood, metal, and plastic.
2. Versatility: Chalk paint hutch can be used on a wide range of furniture pieces, including hutches, dressers, tables, and chairs. It can also be applied to walls, floors, and even fabric.
3. Distressed Look: Chalk paint hutch is perfect for achieving a distressed or aged appearance. By using simple techniques like sanding or waxing, you can create a vintage-inspired finish.
4. Customizability: Chalk paint hutch comes in a variety of colors, allowing you to choose the perfect shade for your desired look. It can also be easily mixed to create your own unique color.
5. Low Odor: Unlike traditional paint, chalk paint hutch has a low odor, making it suitable for indoor use without causing discomfort.
Disadvantages of Chalk Paint Hutch
1. Limited Color Range: While chalk paint hutch offers a wide range of colors, it may not have the same extensive selection as traditional paint.
2. Less Durable: Chalk paint hutch may require additional protection, such as wax or a sealant, to ensure its longevity and durability.
3. Higher Cost: Chalk paint hutch can be more expensive than regular paint due to its unique formulation and popularity.
4. Not Suitable for High-Traffic Areas: Due to its matte finish, chalk paint hutch may not be the best option for surfaces that receive heavy use, as it can be prone to scuffs and marks.
5. Requires Additional Techniques: Achieving certain effects, such as a smooth finish or a specific texture, may require additional techniques or the application of various tools.
Who Should Use Chalk Paint Hutch? 🖌️
Chalk paint hutch is a great choice for anyone looking to transform their furniture with a unique touch. Whether you are a DIY enthusiast or an interior designer, chalk paint hutch offers endless possibilities for creativity. It is especially popular among those who appreciate the vintage or shabby-chic aesthetic.
If you enjoy refurbishing furniture or want to give your home a personalized touch, chalk paint hutch is the perfect medium for your projects. It allows you to breathe new life into old or outdated furniture pieces, creating a cohesive and stylish look in your space.
When Should You Choose Chalk Paint Hutch? ⏰
Chalk paint hutch is an excellent choice for various scenarios. Here are a few instances where chalk paint hutch can be the perfect solution:
1. Upcycling Furniture: If you have old or worn-out furniture that needs a makeover, chalk paint hutch can be a game-changer. It allows you to revitalize the piece and give it a fresh new look without spending a fortune on buying new furniture.
2. Creating a Vintage Look: Chalk paint hutch is ideal for achieving a vintage or shabby-chic look. If you want to add a touch of nostalgia to your home decor, chalk paint hutch can help you achieve that effortlessly.
3. Personalizing Furniture: Chalk paint hutch offers endless possibilities for personalization. Whether you want to add a pop of color or experiment with different textures, chalk paint hutch allows you to express your creativity and make a statement.
4. Updating Home Decor: If you feel like your home decor needs a refresh, chalk paint hutch can be a cost-effective solution. By repainting your furniture pieces with chalk paint, you can transform the entire look and feel of your space without breaking the bank.
Where Can You Use Chalk Paint Hutch? 🏠
The versatility of chalk paint hutch allows it to be used in various spaces within your home. Here are some areas where chalk paint hutch can make a statement:
1. Living Room: Paint your hutch with chalk paint to create a focal point in your living room. It can serve as a display unit for your favorite decor pieces or even be used as a mini bar.
2. Kitchen: Use chalk paint hutch to transform your kitchen cabinets or island. The matte finish adds a touch of sophistication, while the wide range of available colors allows you to create a customized look.
3. Bedroom: Repaint your dresser or wardrobe with chalk paint hutch to give your bedroom a vintage or rustic vibe. It can instantly elevate the aesthetic of the room and add a sense of charm.
4. Home Office: Utilize chalk paint hutch to revamp your office furniture and create a stylish and inspiring workspace. The matte finish can reduce glare from the computer screen, ensuring a comfortable working environment.
5. Dining Room: Give your dining room a makeover by painting your hutch with chalk paint. It can serve as a storage unit for your fine china or as a display for your favorite collection of plates and glasses.
6. Outdoor Spaces: Chalk paint hutch is not just limited to indoor use. You can also apply it to outdoor furniture, such as a hutch on your patio or balcony. It can withstand various weather conditions and add a touch of elegance to your outdoor decor.
Why Choose Chalk Paint Hutch? ❓
Chalk paint hutch has become increasingly popular among interior designers and DIY enthusiasts for several reasons:
1. Ease of Use: Unlike traditional paint, chalk paint hutch requires minimal preparation and can be applied directly to most surfaces. It eliminates the need for sanding or priming, making it a beginner-friendly option.
2. Unique Finish: The matte finish of chalk paint hutch offers a distinct texture and depth, adding character to any piece of furniture. It creates a velvety appearance that is both elegant and timeless.
3. Versatility: Chalk paint hutch can be used on a wide range of surfaces, not just furniture. From walls to floors, it allows you to transform your entire space with a cohesive look.
4. Distressed Look: Achieving a distressed or aged appearance is effortless with chalk paint hutch. By using basic techniques, such as sanding or waxing, you can create a vintage-inspired finish that adds charm to your decor.
5. Environmentally Friendly: Most chalk paint hutch brands are water-based and have low volatile organic compounds (VOCs). This makes them safer for both the environment and your health.
How to Apply Chalk Paint Hutch? 🖌️
Applying chalk paint hutch is a straightforward process that allows you to achieve professional-looking results. Follow these step-by-step instructions for a flawless finish:
Materials You Will Need:
– Chalk paint hutch in your desired color
– A paintbrush or roller
– Sandpaper or a sanding block
– Soft cloth or tack cloth
– Wax or sealant (optional)
Step 1: Prepare the Surface
Clean the surface of your hutch thoroughly to remove any dirt, dust, or grease. Lightly sand the surface to create a smooth base for the paint. Wipe away any dust with a soft cloth or tack cloth.
Step 2: Apply the First Coat
Using a paintbrush or roller, apply the first coat of chalk paint hutch in even strokes. Start with the larger areas and move on to the smaller details. Allow the paint to dry completely before applying additional coats.
Step 3: Apply Additional Coats (If Needed)
If desired, apply additional coats of chalk paint hutch to achieve a more opaque finish. Allow each coat to dry completely before moving on to the next one. Remember to lightly sand between coats for a smooth surface.
Step 4: Seal the Paint (Optional)
If you want to protect the paint and create a more durable finish, apply a wax or sealant. This step is especially important if the hutch will be exposed to moisture or heavy use. Follow the manufacturer’s instructions for the specific product you choose.
Step 5: Finishing Touches
Once the paint is dry and sealed, you can add any additional details or decorative touches, such as distressing or waxing. These steps are optional and can be customized to achieve your desired look.
Frequently Asked Questions ❓
1. Can I use chalk paint hutch on any surface?
Yes, chalk paint hutch can be applied to various surfaces, including wood, metal, and plastic. However, it is important to ensure that the surface is clean and properly prepared before painting.
2. Do I need to sand or prime before applying chalk paint hutch?
Chalk paint hutch is known for its adhesion properties, which eliminate the need for extensive sanding or priming. However, it is recommended to lightly sand the surface and remove any debris before painting for the best results.
3. Can I mix different colors of chalk paint hutch?
Yes, chalk paint hutch can be easily mixed to create custom colors. Experiment with different combinations to achieve the perfect shade for your project.
4. How should I clean and maintain chalk paint hutch?
To clean chalk paint hutch, use a soft cloth or sponge with mild soap and water. Avoid abrasive cleaners, as they can damage the finish. For maintenance, you can periodically apply a thin layer
This post topic: Hutch


